Displacement Sensors / Measurement Sensors
| Introduction | Features |
|
|
Classifications |
| Engineering Data |
|
|
|
Troubleshooting |
-
 What Is a Displacement Sensor?
-
 What Is a Measurement Sensor?
-
 Features
-
 Operating Principles and Classification
What Is a Displacement Sensor?
A Displacement Sensor is a device that measures the distance between the sensor and an object by detecting the amount of displacement through a variety of elements and converting it into a distance. Depending on what element is used, there are several types of sensors, such as optical displacement sensors, linear proximity sensors, and ultrasonic displacement sensors.
What Is a Measurement Sensor?
A Measurement Sensor is a device that measures the dimensions of an object by converting changes in amount of light into electrical signals when the object interrupts a wide laser beam.
Features
1. A physical quantity of an object can be measured.
A Displacement Sensor measures and detects changes (displacement) in a physical quantity.
The Sensor can measure the height, width, and thickness of an object by determining the amount of displacement of that object.
A Measurement Sensor measures the position and dimensions of an object.
2. Physical quantity output is also possible in addition to ON/OFF signal output.
Analog output of physical quantities (current output or voltage output) can also be performed (excluding some models).
Some models also support digital (serial) communications.
Operating Principles and Classification
Displacement Sensors
1. Optical Displacement Sensors
Triangulation Measurement Method
These sensors use a triangulation measurement system.
Some sensors employ a PSD, and others employ a Imaging Device (CCD and CMOS) as the light receiving element.
• PSD Method
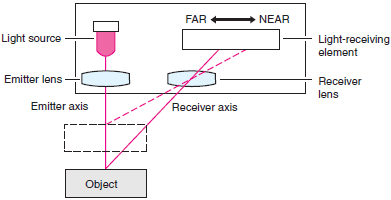
Light from the light source is condensed by the lens and directed onto the object.
Light reflected from the object is condensed onto a one-dimensional position sensing device (PSD)* by the receiving lens. If the position of the object (the distance to the measuring device) changes, the image formation positions on the PSD will differ and the balance of the two PSD outputs will change.
If the two outputs are A and B, calculate A/(A + B) and use appropriate values for the span coefficient "k" and the offset "C" as shown below.

* PSD: Position Sensitive Device
• Imaging Device Method (CCD Method and CMOS Method)
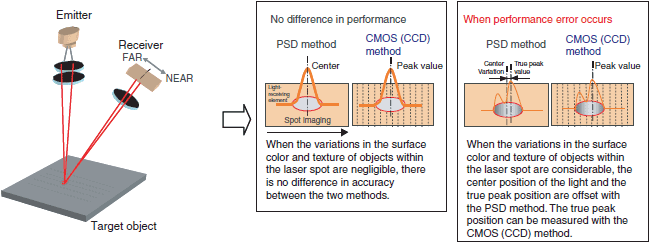
Compared with a sensor that employs the PSD method, a sensor that employs a CMOS (CCD) as the light receiving element provides a more accurate measurement of displacement without being affected by surface color and texture of objects.
The sensor detects the amounts of light on individual pixels in the CMOS (CCD) and converts them into a distance when a spot beam that reflects off of the surface of the object is projected onto the light receiving element.
Differences between CMOS and CCD
CCD stands for Charge Coupled Device, and CMOS stands for Complementary Metal Oxide Semiconductor.

• Regular Reflection Model and Diffuse Reflection Model
Regular reflection
A specular reflection is produced, such as from a mirror surfaced or glossy object.

Diffuse reflection
A beam is reflected in all directions from an object with a standard surface.

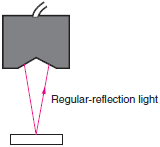
Regular reflection model
Light from the object is directly received by regular reflection, and stable measurement is possible of metal and other objects with a glossy surface.
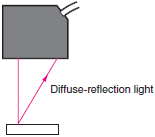
Diffuse reflection model
A light beam is projected perpendicularly onto the surface of the object, and the diffuse light that is reflected back is received for a wide measurement area.
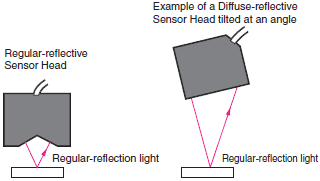
Regular-reflective Sensor Heads receive direct light from regular reflections off the object. Stable measurements can be achieved for objects made of metal or other materials with a glossy surface, but there is a narrower measurement range than Diffuse-reflective Sensors.
Diffuse-reflective Sensors use a Sensor Head tilted at an angle to receive regular-reflection light. This allows the Sensor Head to be placed at a distance away from the object.
• Line Beams and Spot Beams
Line Beam Model
This model measures the average displacement within a line beam. Depending on the measurement conditions, this model provides stable measurements without being affected by bumps or unevenness on the object surface.

Spot Beam Model
This model is more susceptible to the influence of bumps or unevenness on the object surface.

Confocal Principle
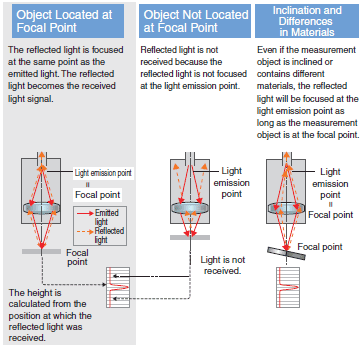
Based on the confocal principle, the emitted light and received light are positioned along the same axis. Light is received only when it is focused on the measurement object, allowing the height to be calculated.
The received light waveform is not disrupted by the material or inclination of the measurement object. The received light waveform is always stable, which enables high-resolution measurements.
•White Light Confocal Principle
The white light from the LED is focused at different points for each color (i.e., wavelength) due to a special set of lenses in the OCFL module in the Sensor Head. As a result, only the color of light that is focused on the measurement object is returned, allowing the distance from the Sensor Head to the measurement object to be calculated based on the color of the reflected light. The Sensor Head contains the special set of lenses that separates white light into different colors and the Controller contains the white LED light source, and the spectroscope and processor that convert the color of the reflected light to a distance. There is no needs for a lens drive mechanism or electronic parts in the Sensor Head, even though they were considered to be standard in previous confocal models. This achieves a much more compact design and much greater immunity to noise than triangulation models and or previous confocal models.
The height is detected based on the wavelength.
The reflected light of the wavelength that was focused on the surface of the measurement object passes through the fiber and the spectroscope in the Controller converts the wavelength to a distance.
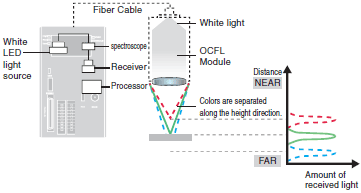
The OCFL module contains a special lens set developed by OMRON that changes the focal point for each color (i.e., wavelength) of white light.The spot diameter is the same at any position within the measuring range. It does not change the way it does for a triangulation. High-precision lens manufacturing technology has allowed us to achieve a lens structure that is extremely small and that also does not require a drive mechanism.
Note: OCFL: Omron Chromatic Focus Lens

Light-cutting Method
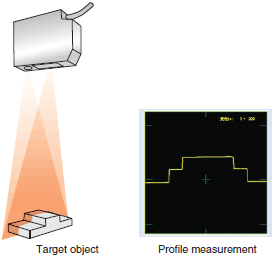
The widely-spread laser beam is projected on the measurement object to measure its cross-sectional shape.
A band-like laser beam is projected on the measurement object, and the reflection from the object is received by the CCD. A shape profile of the measurement object is formed based on the principle of triangular distance measurement.
Since 2D data of the X and Z axes are measured simultaneously, there is no need to move either the sensor or measurement object.
2. Linear Proximity Sensors
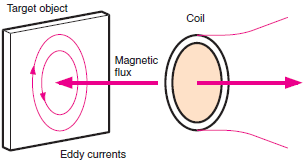
When an AC flows through a coil, magnetic flux occurs in the coil. When the magnetic flux passes through a metal object, it creates eddy currents that generate a magnetic field that tends to oppose changes in the current. As a result, the inductance of the coil changes. The function between the distance from the coil to the object is defined in terms of the variation of the inductance, and the displacement distance can be calculated.
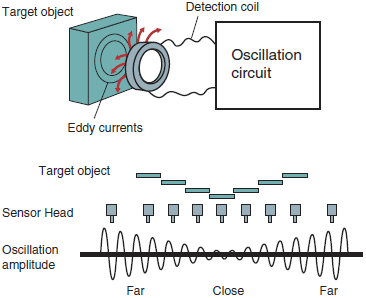
As the distance between the metal object and the Sensor Head decreases, eddy currents increase and the oscillation amplitude of the oscillation circuit decreases.
Conversely, as the distance between the metal object and the Sensor Head increases, eddy currents decrease and the oscillation amplitude of the oscillation circuit increases.
The oscillation amplitude of the oscillation circuit changes as the position of the metal object changes, so measurements are taken by detecting these changes in oscillation amplitude.
3. Ultrasonic Displacement Sensors
A transmitter sends ultrasonic waves toward an object, and a receiver receives the reflected waves back from it. This type of sensor determines the distance by calculating the relationship between the time required for the ultrasonic waves to be sent and received, and the speed of sound.

4. Contact Displacement Sensors
This type of Sensor measures displacement through direct contact of a measured object with the Sensor.
It provides superior measurement precision compared with Contactless Sensors.
Differential Transformer Method
When the Sensor Head touches the object, it depresses the moving core and the center of the core moves away from the center of the coil creating a gap. When both ends of the connected two coils are excited with AC current, the impedance of both coils changes depending on the gap between the center of the coil and the center of the core. This gap (displacement) is output linearly as the differential voltage of the coils, and therefore the displacement of the object can be determined by detecting this differential voltage.
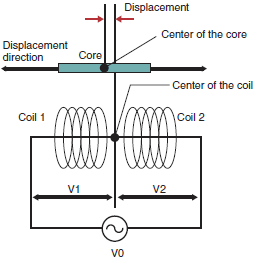
Typical model: ZX-T
Magnetic Sensing Method
When the Sensor Head touches the object, a magnetic scale with north and south poles alternately positioned at a fine pitch inside the Sensor moves.
The change in magnetic flux that occurs at this time is detected with a magnetic resistance sensor to determine the displacement.
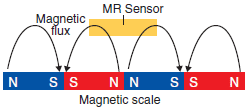
Typical model: E9NC-T
Measurement Sensors
Optical Measurement Sensors
Measurement Sensors, which measure the widths or positions of objects, use one of the following three methods: light intensity determination, Imaging Device, or laser scanning.
All types of measurement sensors consist of an emitter and a receiver.
