 Cautions
-
Control Components
-
Timers
- Temperature Controllers
-
Counters
-
Digital Panel Indicators
-
Signal Converters
-
Temperature Controllers
|
|
|
|
| Safety Precautions |
Related Contents
- Temperature Controllers
-
Models with Standards Certification
-
Glossary of Industrial Automation
Refer to the Safety Precautions for individual products for precautions specific to each product.

The following products contain lithium batteries. Do not disassemble, deform under pressure, heat to over 100°C, or incinerate these products. The lithium battery may ignite or explode.
Applicable models: E5LC.


Do not touch any of the terminals while the power is being supplied. Doing so may result in electric shock.

Do not allow pieces of metal or wire cuttings to get inside the Temperature Controller. Doing so may
result in electric shock, fire, or malfunction.

Do not attempt to disassemble, repair, or modify the Temperature Controller. Any attempt to do so may result in electric shock, fire, or malfunction.

Do not use the Temperature Controller in locations subject to flammable or explosive gases. Doing so may result in an explosion.
The switching capacity and switching conditions will significantly affect the longevity of the output relays. Use the Temperature Controller within the rated load, and do not use the Temperature Controller beyond the number of operations specified under electrical life. Using the Temperature Controller beyond its electrical life may result in contact welding or burning.

Use Temperature Controller settings that are appropriate for the controlled system. Failure to do so may cause unexpected operation resulting in damage to equipment or personal injury.

Prepare a circuit with an overheating prevention alarm and implement other safety measures to ensure safe operation in the event of a malfunction. Loss of operational control due to malfunction may result in a serious accident.
Tighten the terminal screws to the following torque:
M3.5 screws: 0.74 to 0.90 N・m
M3 screws: 0.40 to 0.56 N・m
Failure to tighten terminal screws to the correct torque may result in fire or malfunction.
Make sure there will be no adverse affects from the device connected to the Temperature Controller before using the hardware test mode. Devices connected to the Temperature Controller may reach a dangerous state during the test.
Precautions for Safe Use
1. Do not use the Temperature Controller in the following locations:
Locations exposed to radiated heat from heating devices
Locations subject to exposure to water or oil
Locations subject to direct sunlight
Locations subject to dust or corrosive gases (in particular, sulfide gas and ammonia gas)
Locations subject to severe changes in temperature
Locations subject to icing or condensation
Locations subject to excessive shock or vibration
2. Use and store the Temperature Controller within the rated temperature or humidity range specified for each model.
When two or more Temperature Controllers are mounted horizontally close to each other or vertically next to one
another, the internal temperature will increase due to the heat they radiate and the service life of the products
will decrease. In such cases, forced cooling by fans or other means of air ventilation will be required to cool down
the Temperature Controllers.
3. Allow enough space around the Temperature Controller to ensure proper heat dissipation. Do no block the ventilating holes.
4. Be sure to wire properly with correct polarity of terminals.
5. After wiring is completed, do not pull on or bend a terminal block lead wire with a force of 30 N or higher.
6. Do not connect anything to unused terminals.
7. Make sure that the power supply voltages and loads are within specification and rating ranges before using the
Temperature Controller.
8. To avoid inductive noise, keep the wiring for the Temperature Controller's terminal board away from power cables carrying
high voltages or large currents. Also, do not wire power lines together with or parallel to Temperature Controller wiring.
Using shielded cables to separate pipes and ducts is recommended.
Attach surge absorbers or noise filters to peripheral devices that generate noise (e.g., motors, transformers, solenoids,
magnetic coils, or other equipment that has an inductance element). If using a noise filter with the power supply, be sure
to confirm the voltage and the current, and then mount the power supply as near as possible to the Temperature Controller.
Set up the Temperature Controller, along with its power supply, far away as possible from devices that generate strong,
highfrequency waves, such as high-frequency welders and highfrequency machines, and from devices that generate surges.
9. Make sure that the rated voltage is attained within two seconds of turning the power ON.
10.Allow at least 30 seconds for the Temperature Controller to warm up.
11.When using self-tuning, turn ON power for the load (e.g., heater) at the same time as or before supplying power to the
Temperature Controller. If power is turned ON for the Temperature Controller before turning ON power for the load,
self-tuning will not be performed properly and optimum control will not be achieved.
12.In order that power can be turned OFF in an emergency by the person operating the Temperature Controller, install the
appropriate switches and circuit breakers, and label them accordingly.
13.Turn OFF the power before drawing out the Temperature Controller body. Do not touch or apply excessive force to the
terminals or electronic parts. When inserting the body, make sure that electronic parts do not come in contact with
the case.
14.Use alcohol to clean the Temperature Controller. Do not use thinner or other solvent-based substances.
15.Inverters with an output frequency of 50/60 Hz are available, but they may cause the internal temperature of Temperature
Controller to rise, possibly resulting in smoke or burning. Do not use an inverter output to supply power to a Temperature
Controller.
Precautions for Correct Use
Temperature Controllers
Service Life
Use each product within the range of specifications for that product.When the Temperature Controller is incorporated in a control panel, make sure that the Controller’s ambient temperature and not the ambient temperature of the control panel does not exceed the specified temperature range.
The service life of the Temperature Controller and other electronic devices is determined not only by the number of times the relays are switched, but also by the service life of internal electronic components. Component service life is affected by the ambient temperature: the higher the temperature, the shorter the service life, and the lower the temperature, the longer the service life. Therefore, the service life can be extended by lowering the temperature of the Temperature Controller.
Mounting two or more Temperature Controllers side by side, or mounting Temperature Controllers one above another may cause heat to build up inside the Temperature Controllers, which will shorten their service life. If the Temperature Controllers are mounted one above another or side by side, use forced cooling by fans or other means of air ventilation to cool the Temperature Controllers. Be sure not to cool only the terminals. Otherwise, measurement errors may occur.
Ensuring Measurement Accuracy
When extending or connecting the thermocouple lead wires, be sure to use compensating wires that match the thermocouple type.
When extending or connecting the lead wire of the platinum resistance thermometer, be sure to use wires that have low resistance and keep the resistance of the three lead wires the same.
Make sure that the Temperature Sensor type and the input type of the Temperature Controller are the same.
There are two types of platinum resistance thermometer: Pt and JPt. Correct measurement will not be possible if the input type of the Temperature Controller is incorrect.
Mount the Temperature Controller so that it is horizontally level.
If the measurement accuracy is low, check that to see if the input shift has been set correctly.
Waterproofing
Models for which the degree of protection is not specified and models with IP[]0 degree of protection do not have waterproof specifications.
EN/IEC Standards
If the Temperature Controller is to conform to EN/IEC standards, it is recommended to install the following fuse in the power supply terminal section.
Recommended fuse: T2A, 250-VAC, time-lag fuse with low breaking capacity
Operating Precautions
1. It takes up to 5 s for the outputs to turn ON after the power supply is turned ON. Take this time into consideration when the Temperature Controller is incorporated in a sequence circuit.
2. When using self-tuning, turn ON power for the load (e.g., heater) at the same time as or before supplying power to the Temperature Controller. If power is turned ON for the Temperature Controller before turning ON power for the load, self-tuning will not be performed properly and optimum control will not be achieved.
When starting operation after the Temperature Controller has warmed up, turn OFF the power supply and then turn it ON again at the same time as turning ON the power supply for the load.
(Instead of turning the Temperature Controller OFF and ON again, switching from STOP mode to RUN mode can also be used.)
3. Using the Temperature Controller near radios, televisions, or wireless devices may cause reception interference.
Temperature Sensors
Precautions
Make sure that the protective tubing material is suitable for the sensing object. Otherwise, the Temperature Sensor’s protective tubing may be corroded by the sensing object, preventing temperature measurement.
Do not subject the Temperature Sensor’s protective tubing to excessive vibration, shock, or weight. Platinum resistance thermometers in particular use extremely fine resistance elements. Using these Temperature Sensors in locations subject to mechanical shock or vibration may result in broken wires.
Lead Wire Extension
Platinum Resistance Thermometers
Use lead wires for extension with the same resistance and same length for each of the three wires. The resistance of the lead wire will affect the indicated temperature when extended. Therefore, use wires with thick cores. (OMRON does not supply lead wires for extension.)
Thermocouples
Always use compensating conductors for thermocouples when extending the lead wires.
Use a compensating conductor designed for the connected thermocouple. If you use a different type of compensating conductor from the thermocouple or if you use normal copper wires to extend, correct temperature measurement will not be possible. Also, do not connect positive and negative incorrectly.
Thermistors
Use cables with thick core wires for the lead wires used for extension. The lead wires do not have polarity.
Regardless of the type of Temperature Sensor used, resistance to noise will be reduced if the leads are extended. Never extend the lead any further than necessary.
Correct Use
Select a location for installing the Temperature Sensor in which the temperature distribution of the sensing object will not change.
Make sure that the length of the Temperature Sensor’s protective tubing is sufficient to touch or insert into the sensing object. The length of metallic protective tubing must be at least 20 times its diameter, and the length of non-metallic protective tubing must be at least 15 times its diameter.
Do not repeatedly bend the Temperature Sensor at the same point. The minimum allowable bending radius of sheathed Temperature Sensors is approximately five times the protective tubing diameter. Bending part of the sensor at an acute angle and then extending again may result in broken internal wires or cracks in the element. Do not bend the soldered sections.
Do not bend the protective tubing while measuring low temperatures, which will cause the protective tubing to become fragile.
Do not bend sheathed Temperature Sensors to within 100 mm of the end to protect the sensing section.
Do not allow the temperature of the section connecting the protective tubing and lead wire to exceed 70°C for exposed-lead models or 100°C for heat-resistive models.
Do not allow the temperature of the terminal box to exceed 100°C for exposed-terminal models or 90°C for enclosed-terminal models.
Do not subject the ceramic protective tubing of high-temperature thermocouples to sudden heating or cooling. Ceramic protective tubing has a low resistance to thermal shock. Either preheat the protective tubing or gradually heat to the required temperature.
Do not use standard lead wires in locations subject to strong bending stress or on moving parts.
If the thermocouple has crimp terminals, use them only as a secondary means of securing the thermocouple. The thermocouple junction of the thermocouple is at the crimped section of the crimp terminals, so a temperature difference occurs between the screw fixating section and the thermocouple junction. Confirm the difference in temperature between the location that is to be measured and the temperature measured by the thermocouple in advance at the actual application temperature.
Mounting
1. Install explosion-proof models according to the applicable laws and regulations regarding explosion proofing.
2. Sheathed Temperature Sensors with long protective tubing are coiled for shipping. Straighten the tubing by unwinding it in the opposite direction, without twisting it.
3. Do not excessively bend the section connecting the protective tubing to the lead wires of exposed-lead wires models. Do not insert this section into the sensing object.
4. Do not pull the lead wires with force. Doing so may cause broken wires at the connected section.
5. When measuring at high temperatures that cause the protective tubing to warp, either insert the Temperature Sensor vertically or use an appropriate means to hold the Temperature Sensor in place.
6. To obtain more accurate values, maintain the temperature of the exposed protective tubing to prevent heat loss through heat dissipation.
7. If inductive noise is generated in the Temperature Sensor due to power lines or other source, either change the installation position of the Temperature Sensor and lead wires or provide a shield for the lead wires.
8. Use airtight Temperature Sensors for applications using sensing objects below room temperature, to prevent condensation within the protective tubing and faulty insulation.
9. Do not use the Temperature Sensor in locations that may expose the terminals to water or other liquid.
10.Temperature Sensors are precision devices. Do not subject the Temperature Sensors to shock. Take particular care with products that have ceramic components (ceramic protective tubing, platinum resistance thermometers).
11.Do not use ultrasonic cleaning or otherwise subject platinum resistance thermometers to extreme vibration. Doing so may cause wires to break within a short time. For such environments, consider using sheathed thermocouples, which have a superior vibration-resistant construction compared with platinum resistance thermometers and may be more suitable for the required application, depending on the level of vibration.
12.The life of the protective tubing will be significantly shortened when measuring the temperature of dissolved metals. Select protective tubing material to suit the type of dissolved metal to be measured.
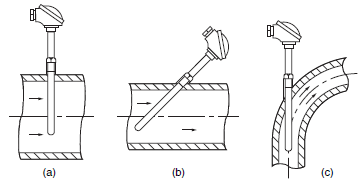
13.Use the following installation methods for applications measuring the temperature of fluids.
(a)Install the Temperature Sensor vertically to the flow in tubes with relatively large diameters that enable deep insertion.
(b)Install the Temperature Sensor on a diagonal against the flow in tubes with slim diameters that do not enable deep insertion.
(c)Install the Temperature Sensor into the convex section of a bend if the tubing diameter is even thinner than in (b).
Use an installation design that provides sufficient strength margin.
Parameter Displays
The following displays are use to represent the characters for parameter names on the Temperature Controller.
Seven-segment Digital DIsplay

Eleven-segment Digital Display
