Power Supplies
|
|
|
|
| Safety Precautions |
Related Contents
This section describes functions and precautions for fully utilizing the capabilities of the Power Supplies.
For precautions for individual Products, refer to the Precautions for Safe Use for that Product.

Minor electric shock, fire, or Product failure may occasionally occur. Do not disassemble, modify, or repair the Product or touch the interior of the Product.

Minor injury due to electric shock may occasionally occur.
Do not touch the terminals while power is being supplied.

Minor burns may occasionally occur. Do not touch the Product while power is being supplied or immediately after power is turned OFF.

Fire may occasionally occur. Tighten the terminal screws with the specified torque.

Minor electric shock, fire, or Product failure may occasionally occur. Do not allow any pieces of metal or conductors or any clippings or cuttings resulting from installation work to enter the Product.
Precautions for Safe Use
Input Voltage
Use a commercial power supply for the power supply voltage input to models with AC inputs.
Inverters with an output frequency of 50/60 Hz are available, but the rise in the internal temperature of the Power Supply may result in ignition or burning. Do not use an inverter output for the power supply of the Product.
Grounding
Connect the ground completely. Electric shock may occur if the ground is not connected completely.
Operating Environment
Use each Product within the rated range for ambient operating temperature, ambient operating humidity, and storage temperature specified for that Product.
Use the Power Supply within the ranges specified for vibration and shock resistance.
Do not use the Power Supply in locations subject to excessive amount of dust or where liquids, foreign matter, or corrosive gases may enter the interior of the Product.
Install the Power Supply well away from devices that produce strong, high-frequency noise and surge.
Do not use the Power Supply in locations subject to direct sunlight.
Mounting
The installation screws can be tightened into the Power Supply only to a limited depth. Make sure that the lengths of the screws protruding into the Power Supply are within the specified dimensions.
Refer to the dimensional diagrams for each model for specific dimensions.
Wiring
Use caution when connecting the input cable to the Power Supply.
The Power Supply Unit may be destroyed if the input cable is connected to the wrong terminals. Use caution when using a model with a DC input. The Power Supply Unit may be destroyed if the polarity is reversed.
Do not apply more than 75-N force to the terminal block when tightening the terminals.
Wiring Materials
Use a wire size that suits the rated output current of the Power Supply to be used in order to prevent smoking or ignition caused by abnormal loads.
Caution is particularly required if the output current from one Power Supply is distributed to multiple loads.
If thin wiring is used to branch wiring, the Power Supply's overload protection circuit may fail to operate depending on factors such as the impedance of the load wiring even when the load is short-circuited.
Therefore, insertion of a fuse in the line or other protective measures must be considered.
Refer to Technical Explanation for Power Supplies to select wiring materials.
Precautions against Ingress of Metal Fragments (Filings)
Drilling on the upper section of an installed Power Supply may cause drilling fragments to fall onto the PCB, thereby short-circuiting and destroying the internal circuits. Whether the Power Supply cover is attached or not, cover the Power Supply with a sheet to prevent ingress of fragments when performing work on the upper section of the Power Supply.
Be sure to remove the sheet covering the Power Supply for machining before power-ON so that it does not interfere with heat dissipation.
Load
Internal parts may possibly deteriorate or be damaged if a short-circuited or overcurrent state continues during operation.
Charging a Battery
When connection a battery at the load, connect an overcurrent limiting circuit and overvoltage protection circuit.
Fan-equipped Power Supplies
Power Supplies equipped with a fan have forced air cooling. Do not block the ventilation holes on the fan installation surface and the opposite surface. The cooling effect will decrease if the holes are blocked.
Always secure the finger guard when replacing the fan.
Always turn OFF the input power before replacing the fan. The input power terminals and internal circuits have a high voltage.
Do not touch the internal parts when replacing the fan. Internal parts have a high voltage and high temperature immediately after the input power is turned OFF.
Do not allow the removed screws or tools to enter the Power Supply when replacing the fan.
Use the specified installation direction and torque specified for each product when replacing the fan.
Disassembly
Do not disassemble the Power Supply except when replacing the fan.
The product's original performance may not be maintained.
Output and Ground Connections
The Power Supply output is a floating output (i.e., the primary side and secondary side are separated), so the output line (i.e., +V or -V) can be connected externally directly to a ground. Through the ground, however, the insulation between the primary side and secondary side will be lost. Confirm that no loops are created in which the Power Supply output is short-circuited through the internal circuits of the load.
Example: When the +V side of the Power Supply is connected directly to a ground and a load is used for which the internal 0-V line uses the same ground.
Precautions for Correct Use
Installation
Mounting Method
Use the Power Supply in the standard mounting to enable proper heat dissipation.
If the Power Supply is mounted in a direction other than the standard mounting direction, the internal temperature of the Power Supply will increase by poor heat dissipation performance . This may cause the Power Supply to fail.
Refer to the Power Supply datasheets for details about the mounting method.
Mounting Space
The Power Supply will generate heat during operation because it does not have 100% conversion efficiency.
Check the datasheets and instruction manuals, and take heat dissipation performance into consideration when you mount the Power Supply.
Functions
Remote Sensing Function
Remote sensing can be used to compensate for a voltage drop on the load lines. (The compensation range is ±10% of the rated output voltage.)
To use remote sensing, remove the short bars from the remote sensing terminals (short-circuited in standard shipments) and wire as shown in the following diagram.
Make sure that the remote sensing screws are not loose. Loose screws will prevent output of the output voltage.
To ensure stable operation, it is advisable to thicken the load connection line and compensate for the amount of voltage drop using the Power Supply’s voltage adjuster (V.ADJ).

Note 1.When the voltage drop in the load lines is large, the overvoltage protection function may activate due to the increase in voltage to correct the voltage drop, so be sure to use as thick as a wire as possible.
Note 2.Be sure that VOUT ✕ IOUT does not exceed the rating of the Power Supply.
Remote Control Function
This function allows the output voltage of Power Supply to be turned ON and OFF with an external signal while the input voltage is being applied to the Power Supply. This function cannot be used at high switching frequencies (i.e., turning the signal ON and OFF for a short time).
If the connection of remote control screws is faulty (e.g., due to loose screws), the output voltage may not be produced. Make sure that the connection is properly tightened.
Make sure that the connection is properly tightened. The application method will differ for each Power Supply. Refer to the datasheets.
Temperature Derating
Reading Derating Curves
The derating curve shows the output range for different ambient temperatures, mounting methods, and cooling methods.
The derating curves depend on the Power Supply model. Refer to the datasheets for details.
The derating curve is given below as an example.
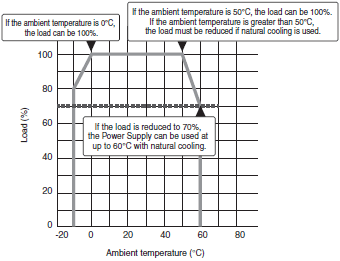
Note:Measure the ambient temperature at a location that is not affected by the heat that is generated by the Power Supply.
(For example, measure it at 50 mm below the Power Supply.)
Two or more Power Supplies Connections
Two or more Power Supplies Connections in Series or Parallel
Whether or not Power Supplies can be connected and the limits on the number of Power Supplies in series or parallel that can connected will depend on the Power Supplies.
For serial or parallel connection, it is necessary for some models to connect an external diode. Refer to the datesheets before you use two or more Power Supplies connections in series or parallel.
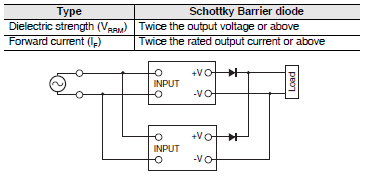
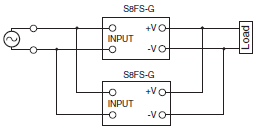
Example for S8FS-G series
Series Operation
Two Power Supplies can be connected in series operation.
Note 1.The diode is connected as shown in the figure. If the load is short-circuited, a reverse voltage will be generated inside the Power Supply. If this occurs the Power Supply may possibly deteriorate or be damaged. Always connect a diode as shown in the figure. Select a diode having the following ratings.

Note 2.Although Power Supply having different specifications can be connected in series, the current flowing through connected in series, the current flowing through the load must not exceed the smaller rated output current.
<Making Positive/Negative Outputs>
The outputs are floating outputs (i.e., the primary circuits and secondary circuits are separated). You can therefore make positive/negative outputs by using two Power Supplies. You can make positive/negative outputs with any of the models. If you use positive/negative outputs, connect two Power Supplies of the same model as shown below. You can combine models with different output capacities and output voltages. However, use the lower of the two rated rated output currents as the current to the loads.
Depending on the model, internal circuits may be damaged due to startup failure when the power is turned ON if loads such as a servomotor or operational amplifier may operate in series.
Therefore, connect bypass diodes (D1, D2) as shown in the following figure. If the list of models that support series connection of outputs says that an external diode is not required, an external diode is also not required for positive/negative outputs.
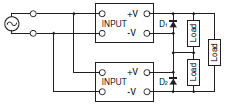
Use the following information as a guide to the diode type, dialectic strength, and current.

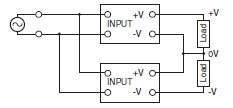
Parallel Operation
Parallel operation is used when the output current from one Power Supply is insufficient for the load. Power Supplies are connected in parallel to increase the output current.
Power Supplies without the Parallel Operation Option
Parallel operation is not possible.
S8FS-G60024[]-W[]
(Models with the Parallel Operation Option)
Up to five Power Supplies can be connected in parallel operation.
You must meet the following conditions to use parallel operation.
The internal parts may occasionally deteriorate or be damaged. To operate in parallel, set the switch to the "PARALLEL" side.
For parallel operation, always use Power Supplies with the same model number.
Use the output voltage adjusters (V. ADJ) to adjust the difference in the output voltages to 50 mV or less between Power Supplies that are used in parallel operation.
The length and thickness of each wire connected to the load must be the same so that there is no difference in the voltage drop value between the load and the output terminals of each Power Supply.
Drastic fluctuations in the load (including fluctuations that occur when starting and starting the load) may reduce the output voltage.
If fluctuations in the output voltage that result from drastic fluctuations in the load would be a problem, connect external diodes as shown in the following diagram.
Use the following information as a guide to the diode type, dialectic strength, and current.