 Cautions
-
 Switches
-
 Level Switches
-
 Limit Switches
-
 Basic Switches
-
 Push Buttons / Indicator Lamps
- Thumbwheel Switches
-
Thumbwheel Switches
|
|
|
|
| Safety Precautions |

Electric shock may possibly occur. Do not perform wiring work or touch the charged parts of terminals while power is supplied to the Switch.


Environment
• Do not use where gases are generated (ammonia, chlorine, sulfur dioxide).
• Although Switches are of nearly dust-proof construction, they are not drip-proof, therefore do not use in areas subject to water or oil exposure and do not operate with wet or oily hands. (The A7MD has a dust-proof construction on contact parts, but consider your installation location carefully.
• Provide additional dust-proofing measures, such as using a dustproof cover, when using in sand-exposed areas.
Storage
Do not store Switches in areas subject to high temperature or high humidity, or store them in room-temperature areas for extended periods of time. Doing so may cause oxidation of the terminals or problems with solder. It is also recommended that long periods of storage be avoided in general.
Handling
• Wiring
After wiring has been completed, ensure an appropriate insulation distance.
• Set-up
Do not use the Switch in the normally-pressed state. Doing so may occasionally result in premature deterioration of parts and changes in the characteristics.
• Do not touch charged parts, such as terminals, while the power is ON.
• Do not connect more than one power supply to a single Switch. Doing so may result in circuit malfunctions and short-circuits.
• When changing settings, do not touch the operating buttons if your fingers are wet or there is oil or any other foreign substance on your fingers.
• It is recommended that alcohol is used to wipe off dirt and smudges from the molded-plastic cases. Take care to prevent the alcohol from getting inside.
• Do not use thinner or other solutions which might damage the plastic.
• When connecting Switches, fit the mating parts together.
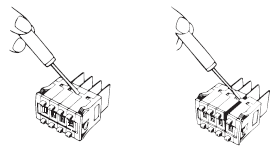
• When separating Switches, use a screwdriver as shown in the figure below; disconnect them by releasing the top and bottom hooks. Be careful not to bend the hooks.

• Do not push the (+) and (-) operating push-buttons at the same time.
• Do not drop the Switch. Doing so may possibly result in deformation of the terminals, damage to the PCB, or damage to the resin catch (for connecting) on the side of the Switch.
• The output may be unstable while the pushbuttons are being pressed due to the structure of the Thumbwheel Switch. Read the output signal only after the display has stopped moving.
Models with PCB Terminals
• When using models with PCB terminals, make the terminal insertion holes in the back board (mother board) 1 mm or larger in diameter.
• Do not use excessive force in handling models with PCB terminals. In particular, take care to avoid dropping them as the terminals might bend or break.
Note: Terminals can withstand a force of 7.84 N for 1 minute or more (A7D: 4.9 N for 10 seconds or more), and survive bending of 20° without breaking after returning to original position. Withstanding the repetitive application of external pressure, however, is beyond the scope of Switch specifications.

Connectors
• Insert Connectors while keeping the arrow pointing up (refer to A7BS/A7BL and A7PS/A7PH for details).
• Connector insertion load is about 14.7 N for each A7B-C and 34.3 N for each NRT-C.
Soldering
Note the following points when soldering printed circuit boards:
• Automatic Soldering
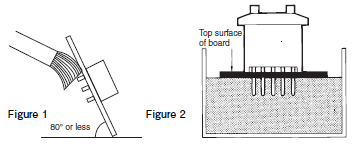
Do not use dip cleaning. Doing so may result in flux penetration of the Switch interior, causing contact and rotational defects. Clean the flux as shown in Figure 1, tilting the Switch 80° or less and using a brush to apply the solvent only to the back of the board. It may also be cleaned by dipping only the back of the board into the solvent and then using a brush to clean.
• Dip Soldering
When applying flux solvent, the dipping time is a maximum of 2 seconds. As shown in Figure 2, avoid flooding the top surface of the printed circuit board with flux. Using a brush to apply flux further reduces the danger of flux penetration. When cleaning flux with a brush, tilt the Switch 80° or less, as shown in Figure 1, in order to prevent flux from flowing onto the switch mounting surface. Clean flux as described above under Automatic Soldering.

• Using a Soldering Iron
Use a 30-W soldering iron at a temperature of 350°C for a maximum of 3 seconds, and flush as described above.
Do not apply force to the terminals during soldering and for 3 minutes after soldering is completed. Doing so may result in conduction or operation failure.
• Ensure that soldering flux and alcohol do not penetrate into the Switch interior.