Limit Switches
|
|
|
|
| Safety Precautions |
Related Contents
Refer to the Precautions section for each Switch for specific precautions applicable to each Switch.
Precautions for Safe Use
If the Switch is to be used as a switch in an emergency stop circuit or in a safety circuit for preventing accidents resulting in injuries or deaths, use a Switch with a direct opening mechanism, use the NC contacts with a forced release mechanism, and set the Switch so that it will operate in direct opening mode.
For safety, install the Switch using one-way rotational screws or other similar means to prevent it from easily being removed.
Protect the Switch with an appropriate cover and post a warning sign near the Switch in order to ensure the safety.
Do not supply electric power when wiring. Otherwise electric shock may result.
Keep the electrical load below the rated value.
Be sure to evaluate the Switch under actual working conditions after installation.
Do not touch the charged switch terminals while the Switch has carry current, otherwise electric shock may result.
If the Switch has a ground terminal, be sure to connect the ground terminal to a ground wire.
Do not disassemble the Switch while electric power is being supply. Otherwise electric shock may result.
The durability of the Switch greatly varies with switching conditions. Before using the Switch, be sure to test the Switch under actual conditions. Make sure that the number of switching operations is within the permissible range.
If a deteriorated Switch is used continuously, insulation failures, contact weld, contact failures, switch damage, or switch burnout may result.
Maintain an appropriate insulation distance between wires connected to the Switch.
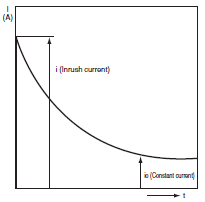
Some types of load have a great difference between normal current and inrush current. Make sure that the inrush current is within the permissible value. The greater the inrush current in the closed circuit is, the greater the contact abrasion or shift will be.
Consequently, contact weld, contact separation failures, or insulation failures may result. Furthermore, the Switch may become broken or damaged.
Wiring
Pay the utmost attention so that each terminal is wired correctly.
If the terminal is wired incorrectly, the Switch will not function.
Furthermore, not only will the Switch have a bad influence on the external circuit, the Switch itself may become damaged or burnt.
Mounting
Do not modify the actuator, otherwise the operating characteristics and performance of the actuator will change.
Do not enlarge the mounting holes of the Switch or modify the Switch. Doing so may result in insulation failures, housing damage, or physical injuries.
Be sure to evaluate the Switch under actual working conditions after installation.
Do not apply oil, grease, or other lubricants to the moving parts of the actuator, otherwise the actuator may not operate correctly.
Furthermore, intrusion of oil, grease, or other lubricants inside the Switch may reduce sliding characteristic or cause failures in the Switch.
Mount the Switch and secure it with the specified screws tightened to the specified torque along with flat washers and springs. The actuator of a Pushbutton Limit Switch mounted to a panel with excessive tightening torque may not operate correctly.
Be sure to wire the Switch so that the conduit opening is free of metal powder or any other impurities
If glue or bonding agent is applied, make sure that it does not adhere to the movable parts or intrude inside the Switch, otherwise the Switch may not work correctly or cause contact failure. Some types of glue or bonding agent may generate a gas that may have a bad influence on the Switch. Pay the utmost attention when selecting the glue or locking agent.
Do not drop or disassemble the Switch, otherwise the Switch will not be capable of full performance. Furthermore, the Switch may become broken or burnt.
Some models allow changes in head directions. When changing the head of such a model, make sure that the head is free of any foreign substance. Tighten each screw of the head to the rated torque.
Be sure to take measures so that no foreign material, oil, or water will penetrate into the Switch through the conduit opening. Be sure to attach a connector suited to the cable thickness and tighten the connector securely to the rated torque.
Do not impose shock or vibration on the actuator while it is fully pressed. Otherwise, the actuator will partially abrade and an actuation failure may result.
Wiring
If the wiring method is incorrect, the wires may get caught on objects or the lead wires may be pulled excessively. Make sure that the lead wires are sufficiently long and secure them along the wiring path.
Pay the utmost attention so that each terminal is wired correctly. If a terminal is wired incorrectly, the Limit Switch will not function properly. Furthermore, not only will the Limit Switch have an adverse influence on external circuits, the Limit Switch itself may become damaged or burnt.
Precautions for Correct Use
Switch Operation
The Switch in actual operation may cause accidents that cannot be foreseen from the design stage. Therefore, the Switch must be practically tested before actual use.
When testing the Switch, be sure to apply the actual load condition together with the actual operating environment.
All the performance ratings in this catalog are provided under the following conditions unless otherwise specified.
Inductive load:
A minimum power factor of 0.4 (AC) or a maximum time constant of 7 ms (DC)
Lamp load:
An inrush current 10 times higher than the normal current
Motor load:
An inrush current 6 times higher than the normal current
1.Ambient temperature: +5°C to +35°C
2.Ambient humidity: 40% to 70%RH
Note:An inductive load causes a problem especially in DC circuitry.
Therefore, it is essential to know the time constants (L/R) of the load.

Mechanical Characteristics
Operating Force, Stroke, and Contact Characteristics
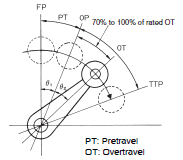
The following graph indicates the relationship between operating force and stroke or stroke and contact force. In order to operate the Limit Switch with high reliability, it is necessary to use the Limit Switch within an appropriate contact force range. If the Limit Switch is used in a normally closed condition, the dog must be installed so that the actuator will return to the FP when the actuator is actuated by the dog. If the Limit Switch is used in a normally open condition, press the actuator to roughly 70% to 100% of the value specified for the OT (i.e., 60% to 80% of the TT).
If the full stroke is set close to the OP or RP, contact instability may result, and it may not be possible to maintain high reliability.
Incorrect operation will easily occur due to vibration or shock. If the full stroke is set to the TTP, the actuator or switch may be damaged due to the inertia of the dog. Therefore, adjust the stroke with the mounting panel or the dog.
Refer to Dog Design, Stroke Settings vs. Dog Movement Distance, and Dog Surface for details.
The following graph shows an example of changes in contact force according to the stroke. The contact force near the OP or RP is unstable, and the Limit Switch cannot maintain high reliability.
Furthermore, the Limit Switch cannot withstand strong vibration or shock.
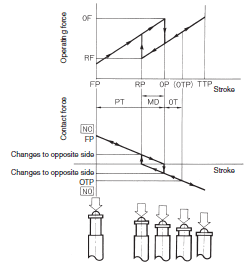
If the Limit Switch is used so that the actuator is continuously pressed, it will fail quickly and reset faults may occur. If the system moves while the cam or dog is in contact with actuator (roller) of the Switch, the travel distance will be longer, and so the wear on the roller and roller axis will increase.
Mechanical Conditions for Switch Selection
The actuator must be selected according to the operating method.
Check the operating speed and switching frequency.
1.If the operating speed is extremely low, the switching of the movable contact will become unstable, thus resulting in incorrect contact or contact weld.
2.If the operating speed is extremely high, the Switch may break due to shock. If the switching frequency is high, the switching of the contacts cannot catch up with the switching frequency. Make sure that the switching frequency is within the rated switching frequency.
Do not impose excessive force on the actuator, otherwise the actuator may become damaged or not operate correctly.
Make sure that the stroke is set within the suitable range specified for the model, or otherwise the Switch may break.
Electrical Characteristics
Electrical Characteristics for Switch Selection
The switching load capacity of the Switch greatly varies between AC and DC. Always be sure to apply the rated load. The control capacity will drastically drop if it is a DC load. This is because a DC load has no current zero-cross point, unlike an AC load. Therefore, if an arc is generated, it may continue comparatively for a long time.
Furthermore, the current direction is always the same, which results in a contact relocation phenomena whereby the contacts easily stick to each other and do not separate when the surfaces of the contacts are uneven.
If the load is inductive, counter-electromotive voltage will be generated. The higher the voltage is, the higher the generated energy will be, which will increase the abrasion of the contacts and contact relocation phenomena. Be sure to use the Switch within the rated conditions.
If the load is a minute voltage or current load, use a dedicated Switch for minute loads. The reliability of silver-plated contacts, which are used by standard Switches, will be insufficient if the load is a minute voltage or current load.
Contact Protective Circuit
Apply a contact protective circuit to increase the contact durability, prevent noise, and suppress the generation of carbide or nitric acid.
Be sure to apply the contact protective circuit correctly, otherwise an adverse effect may occur.
The following provides typical examples of contact protective circuits.
If the Switch is used in an excessively humid location for switching a load that easily generates arcs, such as an inductive load, the arcs may generate NOx, which will change into HNO3 if it reacts with moisture.
Consequently, the internal metal parts may corrode and the Switch may fail. Be sure to select the ideal contact preventive circuit from the following.
Also, load operating times may be delayed somewhat if a contact protective circuit (a surge killer) is used.
Typical Examples of Contact Protective Circuits
| Circuit example | Applicable current | Feature and details | Element selection | ||
| AC | DC | ||||
| CR circuit |  | Conditional * | O | *When AC is switched, the load impedance must be lower than the CR impedance. | C: 1 to 0.5 μF × switching current (A) R: 0.5 to 1 Ω × switching voltage (V) The values may change according to the characteristics of the load. The capacitor suppresses the spark discharge of current when the contacts are open. The resistor limits the inrush current when the contacts are closed again. Consider the roles of the capacitor and resistor and determine ideal capacitance and resistance values through testing. Generally, use a capacitor that has a dielectric strength of between 200 and 300 V. Use an AC capacitor for an AC circuit, i.e., a capacitor that has no polarity. If, however, the arc shutoff capacity between the contacts is a problem at high DC voltages, it may be more effective to connect a capacitor and resistor across the contacts rather than the load. Performing testing to determine the most suitable method. |
 | O | O | The operating time will be greater if the load is a relay or solenoid. Connecting the CR circuit in parallel to the load is effective when the power supply voltage is 24 or 48 V and in parallel to the contacts when the power supply voltage is 100 to 200 V. | ||
| Diode method |  | × | O | Energy stored in the coil is changed into current by the diode connected in parallel the load. Then the current flowing to the coil is consumed and Joule heat is generated by the resis- tance of the inductive load. The reset time delay with this method is longer than that in the CR method. | The diode must withstand a peak inverse voltage 10 times higher than the circuit voltage and a forward current as high or higher than the load current. |
| Diode and Zener diode method |  | × | O | This method will be effective if the reset time delay caused by the diode method is too long. | If a suitable Zener voltage is not used, the load may fail to operate depending on the environment. Use a Zener diode with a Zener voltage that is about 1.2 times the power supply voltage. |
| Varistor method |  | O | O | This method makes use of constant-voltage characteristic of the varistor so that no high voltage is imposed on the contacts. This method causes a reset time delay. Connecting a varistor in parallel to the load is effective when the supply voltage is 24 to 48 V and in parallel to the contacts when the supply voltage is 100 to 200 V. | Select a varistor with a cut voltage Vc that satisfies the following formula. For AC, the voltage must be multiplied by the square root of 2. Vc > Power supply voltage × 1.5 If Vc is set too high, effectiveness will be reduced because high voltages will not be cut. |
Do not apply contact protective circuits (surge killers) as shown below.
 | This circuit effectively suppresses arcs when the contacts are OFF. When the contacts are open, capacity is stored in the capacitor, and short-circuit current of the capacitor will flow when the contacts are turned ON, which may cause contacts to weld. |
 | This circuit effectively suppresses arcs when the contacts are OFF. When the contacts are ON again, however, charge current will flow to the capacitor, which may result in contact weld. |
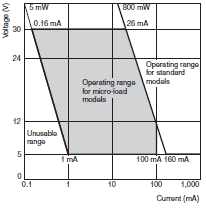
Using Switches for Micro Loads
Contact faults may occur if a Switch for a general-load is used to switch a micro load circuit. Use switches in the ranges shown in the diagram on the right. However, even when using micro load models within the operating range shown here, if inrush current occurs when the contact is opened or closed, it may increase contact wear and so decrease durability. Therefore, insert a contact protection circuit where necessary. The minimum applicable load is the N-level reference value. This value indicates the malfunction reference level for the reliability level of 60% (λ60).
The equation, λ60 = 0.5 × 10⁻⁶/operations indicates that the estimated malfunction rate is less than 1/2,000,000 operations with a reliability level of 60%.
Connections
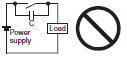
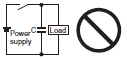
Do not connect a Single Limit Switch to two power supplies that are different in polarity or type.
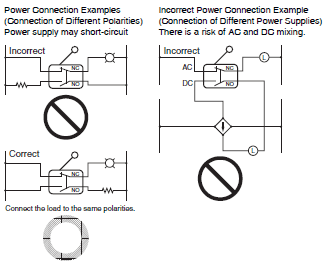
Do not design a circuit where a difference of voltage exists between contacts, otherwise contact welding may result.
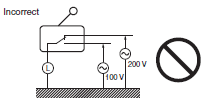
Do not use a circuit that will short-circuit if an error occurs, otherwise the charged part may melt and break off.

Application of Switch to a Low-voltage, Low-current Electronic Circuit.
1.If bouncing or chattering of the contacts results and causes problems, take the following countermeasures.
(a)Insert an integral circuit.
(b)Suppress the generation of pulse from the contact bouncing or chattering of the contacts so that it is less than the noise margin of the load.
2.Conventional silver-plated contacts are not suited to this application. Use gold-plated contacts, which are ideal for handling minute voltage or current loads.
3.The contacts of the Switch used for an emergency stop must be normally closed with a positive opening mechanism.
In order to protect the Switch from damage due to short-circuits, be sure to connect a quick-response fuse with a breaking current 1.5 to 2 times larger than the rated current to the Switch in series.
When complying with EN approved ratings, use a 10-A IEC 60269- compliant gI or gG fuse.
Operating Environment
Do not use the Switch by itself in atmospheres containing flammable or explosive gases. Arcs and heating resulting from switching may cause fire or explosion.
Use protective covers to protect Switches that are not specified as waterproof or airtight whenever they are used in locations subject to splattering or spraying oil or water, or to accumulation of dust or dirt.
The materials of Limit Switch may change in quality or deteriorate if the Limit Switch is used outdoors or any other location where the Limit Switch is exposed to special machining oil. Consult your OMRON representative before selecting the model.
Be sure to install the Switch so that the Switch is free from dust or metal powder. The actuator and the switch casing must be protected from the accumulation of dust or metal powder.
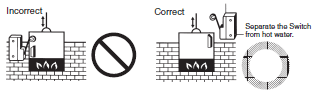
Do not use the Switch in locations where the Switch is exposed to hot water at a temperature greater than 60°C or steam.
Do not use the Switch under temperatures or other environmental conditions not within the specified ranges.
The rated permissible ambient temperature range varies with the model. Refer to the specifications in this catalog. If the Switch is exposed to radical temperature changes, the thermal shock may deform the Switch and the Switch may malfunction.
Be sure to protect the Switch with a cover if the Switch is in a location where the Switch may be actuated by mistake or where the Switch is likely cause an accident.
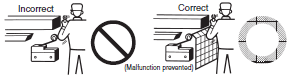
If vibration or shock is continuously imposed on the Switch, contact failure, malfunction, or decrease in service life may be caused by abrasive powder generated from the internal parts. If excessive vibration or shock is imposed on the Switch, the contacts may malfunction or become damaged. Make sure to install the Switch in locations free of constant vibration or shock.
Do not use the Switch with silver-plated contacts for long periods if the switching frequency of the Switch is comparatively low or the load is minute. Otherwise, sulfuric film will be generated on the contacts and contact failures may result. Use the Switch with goldplated contacts or use a dedicated Switch for minute loads instead.
Do not use the Switch in locations with corrosive gas, such as sulfuric gas (H2S or SO2), ammonium gas (NH3), nitric gas (HNO3), or chlorine gas (Cl2), or high temperature and humidity. Otherwise, contact failure or corrosion damage may result.
If the Switch is used in locations with silicone gas, arc energy may create silicon dioxide (SiO2) on the contacts and a contact failure may result. If there is silicone oil, silicone sealant, or wire covered with silicone close to the Switch, attach a contact protective circuit to suppress the arcing of the Switch or eliminate the source of silicone gas generation.
Regular Inspection and Replacement
If the Switch is normally closed with low switching frequency (e.g., once or less than once a day), a reset failure may result due to the deterioration of the parts of the Switch. Regularly inspect the Switch and make sure that the Switch is in good working order.
In addition to the mechanical durability or electrical durability of the Switch described previously, the durability of the Switch may decrease due to the deterioration of each part, especially rubber, resin, and metal. Regularly inspect the Switch and replace any part that has deteriorated in order to prevent accidents from occurring.
If the Switch is not turned On or OFF for a long time, oxidation of the contacts may decrease contact reliability. Faulty continuity may result in accidents.
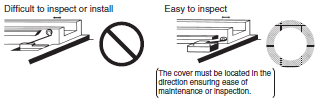
Be sure to mount the Switch securely in a clean location to ensure ease of inspection and replacement. The Switch with operation indicator is available, which is ideal if the location is dark or does not allow easy inspection or replacement.
Storage of Switch
When storing the Switch, make sure that the location is free of corrosive gas, such as H2S, SO2, NH3, HNO3, or Cl2, or dust and does not have a high temperature or humidity.
Be sure to inspect the Switch before use if it has been stored for three months or more.
Weather Resistance, Cold Resistance, and Heat Resistance
Silicon rubber is used to increase resistance to weather, cold, and heat. Silicon rubber, however, can generate silicon gas. (This can occur at room temperature, but the amount of silicon gas generated increases at higher temperatures.) Silicon gas will react as a result of arc energy and form silicon oxide (SiO2). If silicon oxide accumulates on the contacts, contact interference can occur and can interfere with the device. Before using a Switch, test it under actual application conditions (including the environment and operating frequency) to confirm that no problems will occur in actual.
Outdoor Use
If the Limit Switch is used in places with sludge or dust powder spray, make sure that the mechanical parts are sealed with a rubber cap.
The rubber materials exposed to ozone may deteriorate. Check that the rubber parts are made of environment-resistive materials, such as chloroprene, silicone, or fluorine rubber.
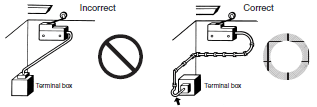
Due to capillary attraction, rainwater may enter the Limit Switch through the lead wires or sheath. Be sure to cover the wire connections in a terminal box so that they are not directly exposed to rainwater.
If the Limit Switch is used outdoors, the steel parts of the Limit Switch (such as the screws and plunger parts) may corrode.
Models with resistance against climatic conditions have been added to the series. Consider using outdoor models, such as the WL-[]P1 or D4C-[]P.
"Limit Switch is used outdoors" refers to an environment where the Limit Switch is exposed directly to rainwater or sunlight (e.g., multistory parking facilities) excluding locations with corrosive gas or salty breezes. A Limit Switch used outdoors may not release due to icing and may not satisfy specified standards.
Operation
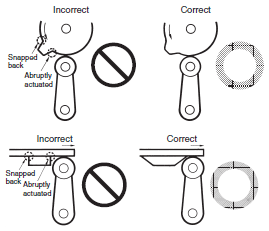
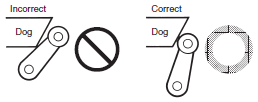
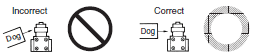
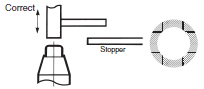
Carefully determine the position and shape of the dog or cam so that the actuator will not abruptly snap back, thus causing shock.
In order to operate the Limit Switch at a comparatively high speed, use a dog or cam that keeps the Limit Switch turned ON for a sufficient time so that the relay or valve will be sufficiently energized.
The method of operation, the shape of the cam or dog, the operating frequency, and the travel after operation have a large influence on the durability and operating accuracy of the Limit Switch. The cam or dog must be smooth in shape.
Appropriate force must be imposed on the actuator by the cam or dog in both rotary operation and linear operation.
If the dog touches the lever as shown below, the operating position will not be stable.
Unbalanced force must not be imposed on the actuator. Otherwise, wear and tear on the actuator may result.
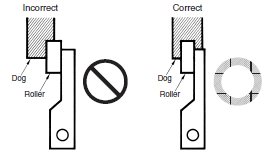
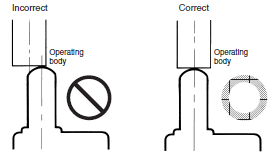
With a roller actuator, the dog must touch the actuator at a right angle. The actuator or shaft may deform or break if the dog touches the actuator (roller) at an oblique angle.
Make sure that the actuator does not exceed the OT (overtravel) range, otherwise the Limit Switch may malfunction. When mounting the Limit Switch, be sure to adjust the Limit Switch carefully while considering the whole movement of the actuator.
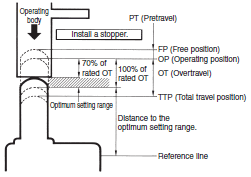
The Limit Switch may soon malfunction if the OT is excessive. Therefore, adjustments and careful consideration of the position of the Limit Switch and the expected OT of the operating body are necessary when mounting the Limit Switch.
When using a pin-plunger actuator, make sure that the stroke of the actuator and the movement of the dog are located along a single straight line.
Be sure to use the Limit Switch according to the characteristics of the actuator.
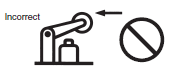
If a roller arm lever actuator is used, do not attempt to actuate the Limit Switch in the direction shown below.
Do not modify the actuator to change the OP.
With the long actuator of an Adjustable Roller Lever Switch, the following countermeasures against lever shaking are recommended.
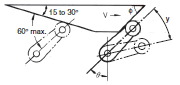
1. Make the rear edge of the dog smooth with an angle of 15° to 30° or make it in the shape of a quadratic curve.
2. Design the circuit so that no error signal will be generated.
3. Use a switch that is actuated in one direction only.
(Alternatively, set the Switch so that it is operated only in one direction.)
With a bevel plunger actuator, make sure that the width of the dog is wider than that of the plunger.
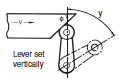
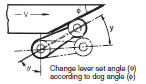
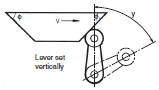
Dog Design
Speed and Angle of Dog and Relationship with Actuator
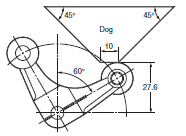
Before designing a dog, carefully consider the operating speed and angle of the dog (φ) and their relationship with the shape of the actuator. The optimum operating speed (V) of a standard dog at an angle of 30° to 45° is 0.5 m/s maximum.
Roller Lever Switches
(1) Non-overtravel Dog
Dog speed: 0.5 m/s max. (standard speed)
| V max. (m/s) | Φ | y |
| 0.4 0.25 0.1 0.05 (low speed) | 30° 45° 60° 60° to 90° | 0.8 (TT) Can be taken to 80% of total travel. |
Dog speed: 0.5 m/s ≤ V ≤ 2 m/s (high speed)
| V max. (m/s) | θ | Φ | y* |
| 0.5 | 45° | 45° | 0.5 to 0.8 (TT) |
| 0.6 | 50° | 40° | 0.5 to 0.8 (TT) |
| 1.3 | 55° to 60° | 30° to 35° | 0.5 to 0.7 (TT) |
| 2 | 65° to 75° | 15° to 25° | 0.5 to 0.7 (TT) |
*The above y values indicate the ratio ranges based on TT (total travel).
Therefore, the optimum pressing distance of the dog is between 50% and 80% (or 50% and 70%).
(2) Overtravel Dog
Dog speed: 0.5 m/s max.
| V max. (m/s) | Φ | y |
| 0.4 0.25 0.1 | 30° 45° 60° | 0.8 (TT) Can be taken to 80% of total travel. |
Dog speed: 0.5 m/s min.
If the speed of the overtravel dog is comparatively high, make the rear edge of the dog smooth at an angle of 15° to 30° or make it in the shape of a quadratic curve. Then lever shaking will be reduced.
| V max. (m/s) | θ | Φ | y* |
| 0.5 | 45° | 45° | 0.5 to 0.8 (TT) |
| 0.6 | 50° | 40° | 0.5 to 0.8 (TT) |
| 1.3 | 55° to 60° | 30° to 35° | 0.5 to 0.7 (TT) |
| 2 | 65° to 75° | 15° to 25° | 0.5 to 0.7 (TT) |
*The above y values indicate the ratio ranges based on TT (total travel).
Therefore, the optimum pressing distance of the dog is between 50% and 80% (or 50% and 70%).
Plunger Switches
If the dog overrides the actuator, the front and rear of the dog may be the same in shape, provided that the dog is not designed to be separated from the actuator abruptly.
Roller Plunger
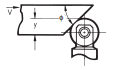
| V max. (m/s) | Φ | y* |
| 0.25 0.5 | 30° 20° | 0.6 to 0.8 (TT) 0.5 to 0.7 (TT) |
Ball Plunger
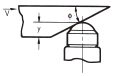
| V max. (m/s) | Φ | y* |
| 0.25 0.5 | 30° 20° | 0.6 to 0.8 (TT) 0.5 to 0.7 (TT) |
Bevel Plunger
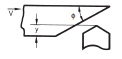
| V max. (m/s) | Φ | y* |
| 0.25 0.5 | 30° 20° | 0.6 to 0.8 (TT) 0.5 to 0.7 (TT) |
*The above y values indicate the ratio ranges based on TT (total travel).
Therefore, the optimum pressing distance of the dog is between 50% and 80% (or 50% and 70%).
Fork Lever Lock Models
*Design the shape of the dog so that it does not come in contact with the other roller lever when the actuator is inverted.
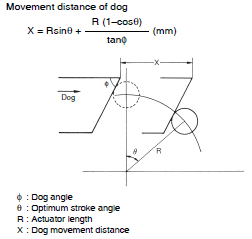
Stroke Settings vs. Dog Movement Distance
The following information on stroke settings is based on the movement distance of the dog instead of the actuator angle.
The following is the optimum stroke of the Limit Switch.
Optimum stroke: PT + {Rated OT × (0.7 to 1.0)} In terms of angles, the optimum stroke is expressed as θ1 + θ2.
The movement distance of the dog based on the optimum stroke is expressed by the following formula.
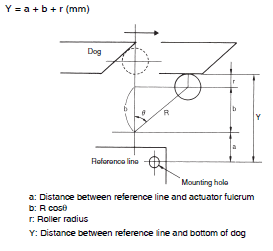
The distance between the reference line and the bottom of the dog based on the optimum stroke is expressed by the following formula.
Dog Surface
The surface of dog touching the actuator should be 6.3 S in quality and a hardness of approximately HV450.
For smooth operation of the actuator, apply molybdenum disulfide grease to the actuator and the dog touching the actuator. This is ideal for Limit Switches of drip-proof construction and Multiple Limit Switches.
Maintenance and Repairs
The user of the system must not attempt to perform maintenance and repairs. Contact the manufacturer of the system concerning maintenance and repairs.
Other
The standard material for the switch seal is nitrile rubber (NBR), which has superior resistance to oil. Depending on the type of oil or chemicals in the application environment, however, NBR may deteriorate, e.g., swell or shrink. Confirm performance in advance.
The correct Switch must be selected for the load to ensure contact reliability. Refer to product datasheets for details.
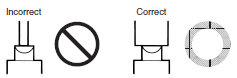
When using a Limit Switch with a long lever or long rod lever, make sure that the lever is in the downward direction.
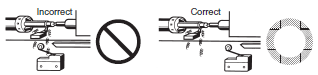
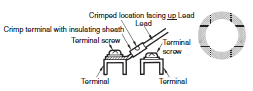
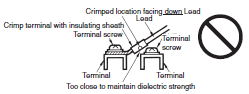
Wire the leads as shown in the following diagram.
Correct Wiring
Incorrect Wiring
Reduced ambient temperature tends to result in hardening of the actuator's rubber seal. Therefore, reset may be delayed or reset may fail if the Switch is used with the actuator continually pressed in. Contact your OMRON representative if the Switch is to be used for this type of environment or application.